
Unleashing the Power of Prompt Engineering in the World of Fashion


In today’s fast-paced and ever-changing business world, companies are constantly seeking ways to innovate and stay ahead of the competition. One approach to achieving this agility is using a process known as the OODA loop, a decision-making framework developed by US Air Force Colonel John Boyd. By adopting this approach, business leaders, entrepreneurs, and innovators can learn valuable lessons on how to accelerate innovation and gain a competitive edge.

The OODA loop is a four-step decision-making process that includes observe, orient, decide, and act. The first step, observe, involves gathering information and data from the environment. The second step, orient, involves analyzing and interpreting this information to gain a clear understanding of the situation. The third step, decide, involves making a decision based on the analysis, and the fourth step, act, involves acting based on the decision.
By following this process, organizations can make informed decisions and act quickly to capitalize on opportunities in the market. It also allows organizations to respond quickly to changes in the market and adjust their strategies accordingly.
As a business leader, entrepreneur, or innovator, adopting the OODA loop can help you stay ahead of the competition and drive innovation within your organization. By observing the market and orienting yourself to the latest trends and technologies, you can make informed decisions and act quickly to implement new strategies. The OODA loop is a continuous process that allows you to constantly monitor and adjust your approach based on feedback from the market, enabling you to stay ahead of the curve and drive innovation within your organization.
The OODA loop can be a powerful tool for driving innovation within organizations. By continuously observing the market and orienting to new information, organizations can make faster and more informed decisions, allowing them to stay ahead of the competition. Here are two practical examples of how the OODA loop can be applied to drive innovation:
By using the OODA loop to drive innovation, organizations can make faster and more informed decisions, stay ahead of the competition, and achieve greater success. The OODA loop is a continuous process, and organizations that embrace it as part of their culture will be better positioned to succeed in today’s rapidly changing business environment.
In this section, we will explore the four stages of the OODA loop and how they can be applied to drive innovation in technology strategy. By applying the OODA loop, we can gather and analyze relevant data, make informed decisions, and take action to continuously improve and innovate our technology solutions.

In the OODA loop, the “Observe” stage involves collecting and analyzing relevant data to gain a comprehensive understanding of the current situation. As a technology strategist, this could include understanding the client’s business goals, market trends, and the potential use cases of blockchain-based digital collectibles. By using data to inform our decision-making, we can make more informed and strategic choices that are backed by evidence rather than gut instinct.
For example, let’s say we are working with a client who wants to enhance their brand image and increase customer engagement. We would start by collecting and analyzing data on their target market, competitors, and customer feedback. This would allow us to identify areas for improvement and potential opportunities for implementing blockchain-based digital collectibles.

The “Orient” stage of the OODA loop involves interpreting the data collected in the “Observe” stage and using it to develop a comprehensive understanding of the current situation. This involves analyzing the data and identifying patterns and trends that can inform decision-making.
For example, after analyzing the data collected in the “Observe” stage, we may identify that the client’s target market is interested in unique, personalized products and experiences. We could then interpret this data to understand that implementing a blockchain-based digital collectible platform could provide customers with a new and exciting way to engage with the brand.

The “Decide” stage of the OODA loop involves using the insights gained in the “Observe” and “Orient” stages to make informed decisions. This involves selecting the right technology and tools to address the identified areas for improvement and meet the client’s business goals.
For example, based on our analysis in the “Observe” and “Orient” stages, we may recommend implementing a blockchain-based digital collectible platform to enhance the client’s brand image and increase customer engagement. We would work with the client to select the right technology and tools to implement this solution, taking into account factors such as budget, timeline, scalability, and the business value we are wanting to achieve during this transformation.

The “Act” stage of the OODA loop involves implementing the decisions made in the “Decide” stage and monitoring the results. This involves tracking key performance indicators (KPIs) and making adjustments as needed to continue driving value for the client.
For example, after implementing the blockchain-based digital collectible platform, we would track KPIs such as customer engagement, brand awareness, and sales. We would use this data to monitor the success of our strategy and adjust as needed to continue driving value for the client. This could include expanding the platform to include new products or features, optimizing the user experience, or exploring new technologies to stay ahead of the competition.

While it isn’t the focus of the current AI hype/news cycle, I can’t write an article about the OODA loop without talking about one of my personal favorite ML fields: reinforcement learning.
Reinforcement learning, like the OODA loop, is a process of continuous improvement based on feedback from the environment. The difference is the RL is focused on solving complex computer problems. It has been used to solve problems in gaming and robotics and has shown promise in a wide range of industries. In fact, it’s not hard to draw parallels between the OODA loop and reinforcement learning — both involve a cycle of observation, orientation, decision-making, and action. As we continue to develop new technologies and strategies for innovation, it’s important to keep in mind the lessons we can learn from these iterative approaches to problem-solving.
A famous example of reinforcement learning in action is the development of AlphaGo and AlphaZero, two artificial intelligence programs developed by Google. AlphaGo and AlphaZero were trained to play the games of Go and chess, respectively, using reinforcement learning. By repeatedly playing against themselves and learning from their successes and failures, these programs were able to achieve unprecedented levels of success and defeat human champions. By using feedback from the environment to continually adjust and improve their decision-making, these AI programs were able to achieve unprecedented levels of success in complex games that were once thought impossible for machines to win.
This highlights the importance of adopting a similar mindset in our approach to innovation and problem-solving, whether it’s developing new technologies or enhancing existing products and services. By continually gathering data and feedback from the market and our customers, and using it to inform our decisions, we can stay ahead of the competition and drive value for our clients and customers.
Innovation can benefit greatly from the application of reinforcement learning principles. By testing and leaning from various strategies and tactics, organizations can quickly adapt to changes in the market and make better decisions. The OODA loop can serve as a useful framework for applying reinforcement learning concepts to the innovation process, helping businesses stay agile and competitive in a rapidly changing landscape.
During my time serving in the US Marine Corps and in emergency services, I witnessed firsthand the power of the OODA loop in dynamic situations. We used this framework to rapidly assess chaotic situations, understand changing environments, and make data-driven decisions in response. The OODA loop allowed us to move with agility and respond quickly to both decentralized threats and opportunities.
Adopting this iterative approach to problem-solving allowed the military to better combat networks of sparsely connected insurgents, marking a fundamental shift from traditional hierarchical thinking. Today, it has been adapted for use in a variety of fields, including technology innovation and machine learning. The OODA loop is a prime example of this philosophy in action. By constantly gathering information, orienting ourselves to new developments, and making informed decisions based on that information, we can stay ahead of the curve and succeed in even the most challenging environments.
Whether we are on the battlefield or in the boardroom, the principles of the OODA loop (and policy gradients) can help us make better decisions and achieve our goals more effectively.


Text-to-image AI is a type of technology that uses natural language processing and machine learning algorithms to generate images based on text input. This technology can be useful for a small business in a number of ways. For example, a small business owner could use text-to-image AI to automatically generate product images for their online store, saving time and effort. The technology could also be used to create marketing materials, such as social media posts or advertisements, by generating images based on specific keywords or phrases. Additionally, text-to-image AI could be used to create personalized content for customers, such as custom product designs or personalized promotional materials. Overall, text-to-image AI can provide a small business with a convenient and efficient way to generate images for a variety of purposes.
The three most important things a small business owner needs to know about text-to-image AI are:

While the technology can generate images automatically, it is important for the small business owner to review and approve the results to ensure they are accurate and appropriate.
The images generated by the system are based on algorithms and pre-determined rules, so they may not always be as creative or unique as those created by a human. Additionally, the system may not be able to understand the nuances and context of a given situation, so a human may be better equipped to make decisions and judgements about what images to use in a given situation. Therefore, it’s important for small business owners to use text-to-image technology as a tool to assist them in their work, rather than relying on it completely.
If someone is interested in getting started with text-to-image AI, there are a few steps they can take. First, they should research the various text-to-image AI tools and platforms available, and compare their features and capabilities to determine which one is the best fit for their needs. Next, they should gather the necessary text input and any other required materials, such as image templates or pre-existing images. Depending on the tool or platform they are using, they may need to set up an account or install the software. Once they have everything they need, they can begin using the text-to-image AI tool to generate images based on their text input. It may take some trial and error to get the desired results, but with practice and experimentation, they can learn how to use the technology effectively.

This article was:
Written by chatGPT,
Images created with Midjourney,
Edited by Cody Burns

Come with me and you’ll see a world of pure imagination — Willy Wonka
In the near future you will be looking to hire a new type of thought worker(or potentially see this skill as often as ‘proficient at excel’ on resumes). This up and coming talent is known as “prompt engineering” and it is time everyone started the discussion and using this amazing new tool.

Prompt engineering/hacking/designing is the practice of crafting Text-to-Image prompts in a way that to create consistent, useable, high quality images for others to use. Text-to-Image is the latest generation of AI which lets users provide a “prompt” similar to a search engine. Unlike a search engine, the images created are completely generated from the engines models “imagination”. The more accurate the prompt, the quicker and more accurate the results are. To be clear, the AI is not searching a database of images to find the closest matches; everything is generated from latent space, in real time. From your mind, to the prompt, to a never before seen creation. You are not constrained by physics, reality, your artistic ability, software licenses, etc, etc, etc. Think it and it comes into existence. Prompt engineering is the art of tuning the words, weights, and perspective into what a customer actually wanted. This technology is not limited to 2d images and is rapidly evolving to AR/VR and everything in between.
Lets talk clip art. There is an unusually large market on the internet for art that can be used in presentations. Businesses pay large amounts for clean professional images that capture the idea they are trying to convey. If I want a clipart coffee cup, a quick google search brings up their best options with various licensing fees and usage rights. Using prompt engineering skills we can generate a basic(ugly) object with relative ease:

This prompt created a useable, image that at least gives the general IDEA of a flat art coffee cup. With a little prompt engineering magic we can produce a much better image:

And since this is a computer program running in the background we can add some spice to the prompt to make it capable of generating many more items in the same style.

Having a prompt one person can use is good. I want more.
So, how can others benefit from (or pay me for) my newly found creative skills? There is a service called “prompt base” which is an emerging market place for prompts. Since we are hoping to push the frontier, this article calls for a bit more…. pizzazz 😁.
I’ll spare the exact details in this post, however, I created an ERC-1155 NFT token on OpenSea which will allow me to create unique assets with unlockable content. Instead of a picture of a monkey, I will allow up to 500 users to purchase the NFT and the owners can reveal the prompt without me ever having to be involved. When a customer buys my prompts they are not buying 1 unique image, they are buying the ability to generate endless variations of my prompt’s styled objects with anything they want(🤯). Bought it for office art, use it to make cars or sunglasses. If they decide to resell their access, I will get 2% of any future trades. At the time of writing this I am offering these custom prompts for ~$1.50 worth of crypto coin. These are also carbon neutral NFTs, the code sits on Polygon network(a L2 for ETH) and the transfer fees are almost non-existent.
Lets do more…. As a prompt engineer I need to drive traffic to my new store, so customers can sample the quality of the products first hand. I have seen others using Spatial.io for their NFT collections and I think this is the perfect opportunity to set up my shop and let the world know we’re open for business. Spatial is a virtual world platform where users can interact with each other, share experiences, showcase art & NFTs.
From zero to a metaverse business in a few hours worth of time. No coding, the future is amazing. Check out The Collection here!

Ready to start the journey down the rabbit hole? The engines are available to the public and most are free to use with a paid model once you get hooked
Engines:
Market place:
How-to:
Think of the internet 20 years from today. Tens of billions of people, trillions of IoT gadgets, millions of data centers; all using currently unimaginable connected devices, all wanting to access data from around the world instantly. What do you think that will mean for the system holding all of this together in the background, the humble file transfer protocol used to move all data around?
Enter the Interplanetary File System(IPFS for short)! A fundamentally different network designed around creating a more secure, open, and flexible system. Learning about and using IPFS today is important because now is the time to be placing your bet on how the internet evolves from here. Fortunately understanding the 3 really important things you need to know will be a piece of cake 🍰
Blockchain is hot these days, and everyone wants a piece of it. If you’re here to learn how a new one works you will be greatly disappointed with this article because first and foremost: IPFS IS A FILE SYSTEM.
Blockchains are a form of distributed database where all the nodes share the exact same information set (very_broad_brush.jpg). These are very useful for a very specific set of problems. Cryptocurrencies, supply chains, and digital identity are examples of use cases being built on them today. If a large group of people want to make sure everyone has the exact same unforgeable data, they can use a blockchain. If everyone on earth wanted to share the ultimate cake recipe and ensure everyone had the exact same version, they could use a blockchain. 👩🍳
File systems are much, much more useful. You likely send and receive files everyday and equally likely never give too much thought of how they are stored, addressed, our distributed. And one thing everyone can be certain of is that they do not have all of the files that exist(nor should they try). In fact, the entire internet was invented to figure out how to arrange and find information when you don’t have all the files you need.
If a blockchain is a recipe(🧾) that everyone shared, files can be thought of as the individual ingredients(🛍️) you have/need. IPFS(🛒) is then a very efficient way to get the ingredients to you kitchen. 🧾 + 🛍️ + 🛒 = 🍰
The traditional internet is location based. You tell a web browser where to find a website and it goes to the server and asks for the information. IPFS turns this concept on its head. With IPFS, you tell the network which file you want and it asks the network of peers who has it.
This concept isn’t as strange as it sounds. Recall the last time you were looking for an ingredient you needed to make a cake. You called ahead to the store so you can do curbside & have two options of hopefully finding it; you can either ask the sales associate to get some flour for you (this is content addressing because you’re asking for what the ingredient is) or ask them for the ingredient on isle 4, 3rd shelf, 15th item from the right (the last location where you knew your ingredient was, location addressing)
Since we don’t care where the flour comes from, only that it is the exact ingredient we need, this is a much more efficient way of ordering and receiving – and content addressing is up to 60% more efficient for online videos as well.
The internet of today has a huge problem that tech folk don’t like to talk about. Our collective demand for streaming content is literally crushing the decades old infrastructure that hosts and delivers our favorite content to our homes and devices.
The hard truth is that “the cloud” is just some mega corporation’s data center and it is limited by same physics as everything else in the universe. A finite amount of data can go in and out at one time.
If you have ever seen the result of a video or website ‘go viral’ and kill a small hosting service you have seen this experiment conducted before. IoT and entire digital native generations are coming to hog all the bandwidth, and they are closing in fast.
The Interplanetary File System will allow the next generations of our beloved infotainment services (ie Netflix, Hulu, and YouTube) spread out the load across a decentralized mesh with absolute guarantee that the data you are getting is exactly what you wanted and unaltered.
For our cake🍰; instead of everyone going to the to same store to get flour (causing shortages and poor social distancing) in the future everyone will just ask their neighbors for flour!
What do you think ? Do you want the world to be powered by distributed networks like IPFS or not ? What about your business? What do you think about the risks of this paradigm shift ? Let us know your thoughts in the comments below!
Links:
A real deep dive on the tech: https://proto.school/course/ipfs
The paper that gave birth to the internet: https://www.w3.org/History/1989/proposal.html
60% faster videos: http://math.oregonstate.edu/~kovchegy/web/papers/p2p-vdn.pdf
Since the lockdowns, video calls have become my day to day life. They consume countless hours a week and are the primary use of my computer now. The tools of the trade I use most are Powerpoint and Teams, but the steps that follow can be modified to the limits to your imagination.This setup could be useful to students, podcasts, streamers, and anyone who uses a computer and wants to do less. The first rule of apocalypse is to have fun and be yourself. 🙂
The goal of this project is simple: Create a macro keyboard for the things I use the most without breaking the bank.
Like many who have ended up on this blog; I am a gamer, a technologist, and like shortcut keys. I am always looking for a way to blend these things together.
I’m a classic gamer with a preference for 8-bit NES. As such, I already have a USB controller(which everyone should) so this is what I would prefer to use in my day to day gig. If you want more buttons you can go for a different controller, but your loss in the gaming aspect.
For project budget and costs, this is the only item needed. An NES gamepad costs ~$12 for a 2 pack and are available at all the finest online retailers.

Next, with the hardware settled, we need to decide what matters most in day to day use and can be mapped over 8 keys
For me it is these:
The actual layout will be something like this:
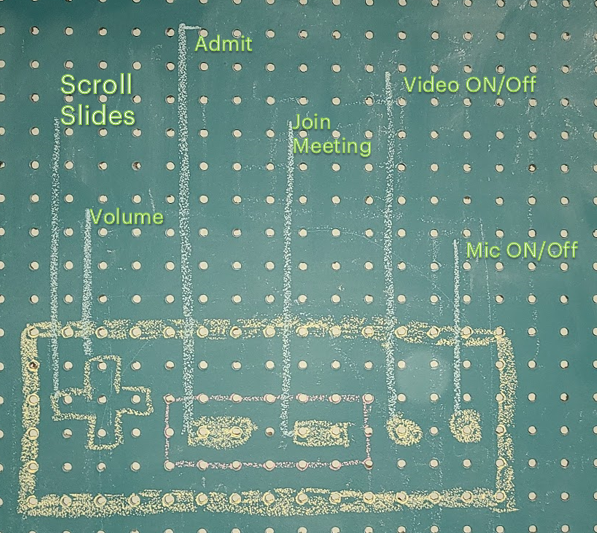
I would have liked a “hand raise and lower hand” key but there isn’t a hotkey I could find so, if you work on this product I really need this.

Obviously everything on the software side needs to be open source so no funny business is going on under the hood. I found antimicro and it fits the bill. Though it is currently unmaintained, it is functional and works well enough for my needs. You can find the releases and source code in their github: https://github.com/AntiMicro/antimicro
Putting it all together took about 30 minutes, counting troubleshooting and blogging.
First things first; plug in controller and install the software
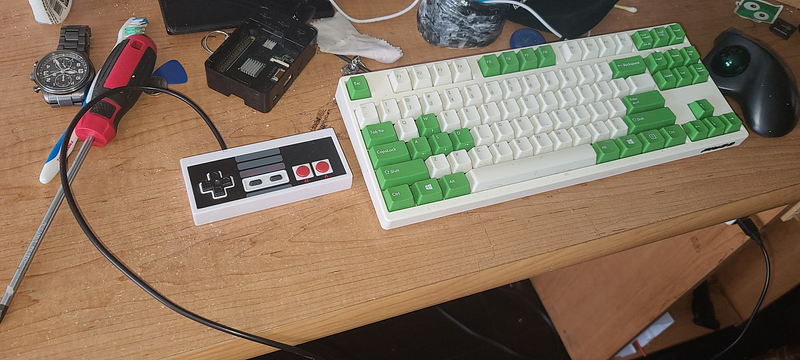
There are some parts which are less intuitive and I will cover them to close out this article, but this the sky is the limit once you figure out shortcut keys you need for an application.
To get the shortcut keys in Teams, press `Ctrl + <period>` and you will get a menu similar to this:
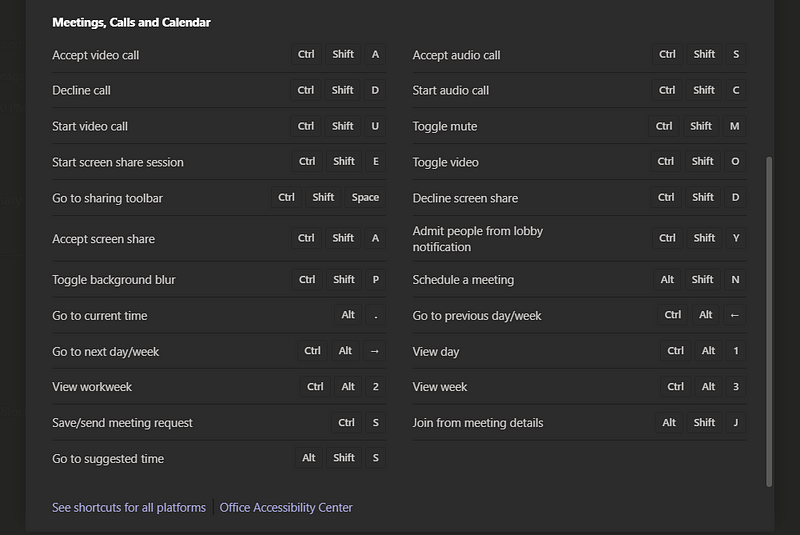
Now press buttons on the controller to see which button it is associated within antimicro. It is very intuitive
For volume keys (up and down on D pad), you can select the option from the “others “ dropdown on the key assigner.
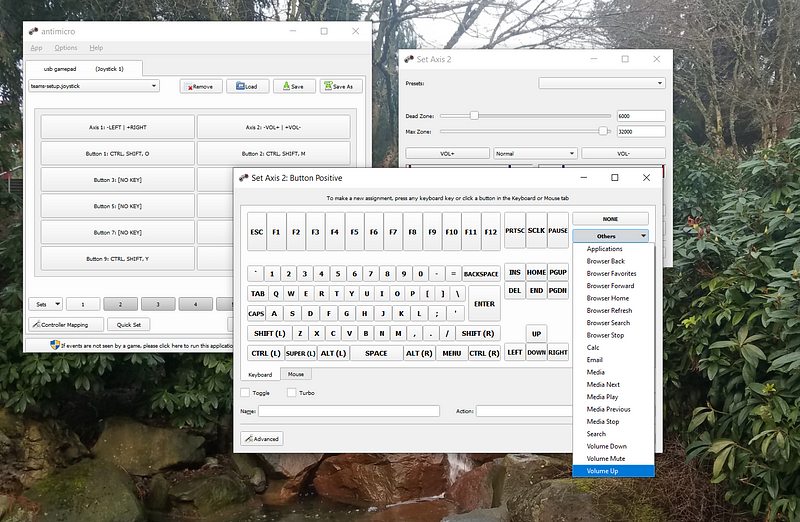
For the complex key combinations, use the advanced mapper on the bottom left of the keypad to sequence your keys.
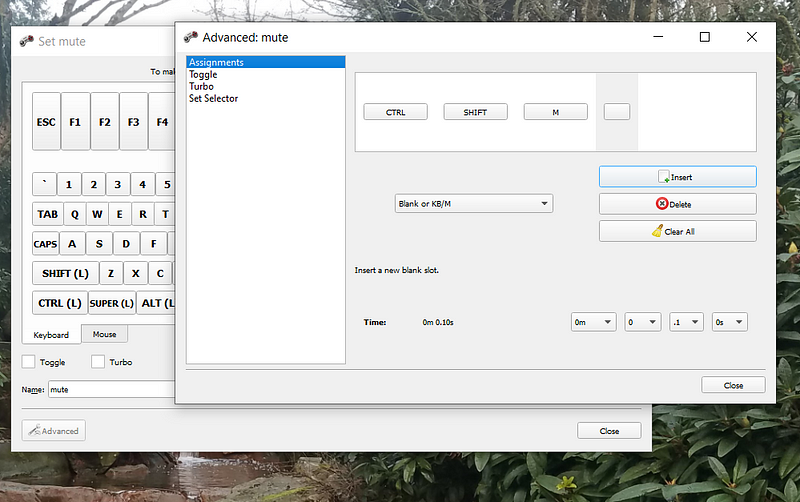
Having now successfully customized your rig, you are now one of the coolest console cowboys at the end of the world. Good luck!

Firstly, I have thoroughly enjoyed the 4+ years of being a part of the ETC community, seeing it grow, take form, and riding the roller-coaster with my internet friends and acquaintances. We were pioneers and have unquestionably left a positive mark on the blockchain industry and open source software. My time we here has given me rare insights into decentralization and leaderless organizations and an amazing opportunity to develop next generation technology with brilliant like minded people.
As many of you know, ETC has always been a volunteer/passion project for me. My pursuits here have to be balanced with my other obligations in life. This pattern was easier to maintain in pre-covid times and when the project was in incubation. I want to enjoy the last few years of my children’s childhood. My wife, and love of my life Jen, has always supported me in this pursuit also, but my time at ETC has always come at the expense of some family time. The calculus on the value of those hours has changed in the last year. I no longer want to be tethered to my phone arguing with strangers online during diner and homework time. And I want more freedom to have time to explore new and exciting technology as well.
Unquestionably, ETC and I are both in better places than when we started. The network and its participants are coming to a fork in the road. The treasury conversation we’ve had off and on for 4 years may be coming to a resolution in the next few months. if not obvious until this point, I will not be participating and will try hard to refrain from any further intervention either way. ETC has always been a managed chain like all public projects with shared goals. That is what a community does and how highly specialized technology is maintained. The conversation now is whether it is to be semi-autonomous or supported with a superfan helping it grow. Both are very valid models that are in keeping with the history and spirit of ETC. I am neutral now and look forward to seeing the peaceful split of communities or emergent governance that develops.
I think there are several possibilities of future states for ETC. I have privately informed Terry(etc labs), Charles(iog), and Bob(Coop) last week I will be selling the rights to the domains I have in my possession to whichever is the highest bidder by November 30th. If none of them can find a way to value it, the domains will go to public auction. This bidding is not any indication of someone buying the chain ETC itself or a corporate takeover, though it will likely be framed as such by the non-winners. The community should make their voice heard on this as well. All three love ETC and have valid roadmaps and development plans. I don’t want the burden of having to be king maker if a chain-split is the best path for growth.Especially as I plan to disengage from actively participating. Managing a domain or repo has been an honor and the community will be fortunate with any outcome.
As i spin down, I will be making this hopefully as seamless as possible.
-I will keep kotti validator running until a replacement operator can be transitioned in properly.
– I am happy to remain in a non paid advisory position on boards until a their natural resolution.
– I will continue administrative duties on the github repo until the community finds a replacement.
– I will retain my community wallet keys and gladly use them to unlock funds when needed
I am forever grateful for the people I have met, the debates we have had, the amazing community that exists, and the memories I’ll always have. I look forward to cheering from the sidelines as ETC embarks on its next exciting phase of the amazing journey. But for me, this is where Peter Pan must leave Neverland.
Semper Fi,
Cody (DontPanic) Burns
There is a new startup in the Ethereum Classic space that has caused a bit of a stir with their initial actions and I would like to take a few minutes to comment on them. For brevity, there is no distinction made between etclabs, the “startup incubator” and DFG, the desperate speculator group. Some may remember them as they made presentations at the ETC summit and they have held themselves out to be a new development team in the space and hopefully they can recover from their recent missteps and join the other dev teams working in the space. Since they are struggling and need some air time, I am writing this open letter to ease the on boarding process.
For clarity sake, github is the system many open source projects use for coordination and version control. It is one of about 5 systems in the CI/CD pipeline that are used to ensure distribution ETC related software. Individual repositories(repos) contain projects, and they are consolidated into organizations (orgs) for easy of search and moderation. There are two roles that are part of a github org, member and owner. “Owners” have the ability to add members, add/del new repos, and change members status (even removing other admins status), and more importantly add CI/CDapps and web integrations, You broke all of those because you are incompetent, please ask if you don’t know what you are doing. There are infact, and have always been, several ”ETC” orgs. IOHK, Parity Tech, BCRD, ETCDEV, etc. In the past, they work on code in their parent org and then merge it with the main branch in the ethereum project org for easy of coordination. Owners do not “own” open source orgs(google: foss), members do. Members are allowed to submit and merge code. Should the new dev group, ETCLABS, have been made members, absolutely! In fact anyone who wants to contribute can and should be made a member. After they foolishly removed all admins from the ethereumproject repo and lost control of the krykoder account, I added them as members to the back up organization ethereumclassic. I have transferred all of the projects I had created to the new repo and the chain moves on. Currently there are 4 “owners, and I will direct you to the volunteer page to see the new requirements that no admin can remove other admins without consent of all to prevent accidents like what had happened to the last org. We are more than happy to add more “owners” if the need arises. But you will need to actually produce work and be active in the community, money doesn’t matter.
ECIP process
ETCLABS has express concerns about not having a voice in the process of improving ETC. The first resource they should use is https://ethereumclassic.org . It will answer many of your noob question regarding testnets, wallets, dapps, etc. If your only concern is about price, I canât help you there other than saying ethereum systems work better when the price is closer to zero than 1 million, but as a speculator group you should have looked into that before losing everyone’s money. For anything else that can improve the ecosystem or network, you need to follow the Ethereum Classic improvement proposal process. This is the common way to make suggestions, you don’t need to strong arm a development team or even ask permission. The repo is located at github.com/ethereumclassic/ECIPs now that the ethereumproject repo has been deprecated. You may be interested to know that another development group with actual chops has proposed a universal set of status codes, I had proposed op code compatibility changes(which should be coming sometime after the Constantinople fork opcodes are tested in January), and several other exciting things that maybe etclabs can even try to help with.
In conclusion
Welcome to Ethereum Classic ETCLABS! I look forward to the day you actually produce anything other than bizarre press releases. Also, please try to refrain from using my name in your revisionist history unless it accurately reflects my contributions to your work. Aside from once conference call with the other development teams, in which you profusely apologized for screwing up the git org, I have never been in contact with you. Feel free to ping me on literally any social media channel as dontpanicburns or email me if you need anything.
Modern blockchain technology relies on different principals than previous generations of blockchains, known as UTXO or generation 1.0, and allows for more robust transaction execution. An introductory stateful blockchain can be expressed as a game of correspondence chess.

The rules of chess are understood by all participants in the network and, as such, it is understood that a knight has a certain series of functions, or moves, it is able to perform. The same holds true for the other pieces of the game.

The genesis state of a traditional the game is presented in figure A. Both participants have a series of pieces that they are able to use and have agreed on the current positions of each. This is conceptually similar to smart contracts on a blockchain. Each contract has a predefined set of functions that are controlled by rules just as each piece as a predefined set of moves it is allowed to make in game play.
In the correspondence chessboard network our consensus mechanism is set as such: each member must make 1 legal move per block. Once the player decides on the move, it must be submitted to a judge. Unlike modern blockchains, the chess game also requires each participant make their move in proper order. The dark pieces are forbidden from sending a transaction until the light pieces have made their commitment. When the light side player submits their move to the judge, it is visible to everyone and unable to be changed. Once both sides have made their commitment to a move, the block is captured as a list of moves (state changes) in PGN format and numbered from the genesis state.
An example of a possible valid block number 1 could be: 1 d4 ♞f6. The
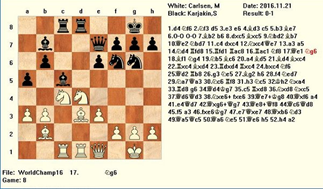
“blocks” are just a list of the moves that were made, not the actual pieces. This can be translated as the light side moving the pawn from d2 to d4 and the dark side moving their knight from g8 to f6. Both are valid moves and arrived in the correct order, so per our consensus rules this is a valid block. Each player will update their board with the new ‘state’. Players are only concerned with the current state, which contracts they can interact with, and what move they want to make next.
As the game progresses, it is possible for any outside participant to validate the current state by reading through a the PGN list of moves from genesis and recreating the game. In the blockchain space this is known as syncing a node. If one of the players needs to take a break or knocks over their board, they are able to sync their board to the current state by reading the move list. A faster way of syncing would be to take a snapshot of the current state and send it to the validator along with the PGN. They would then have the current state and can validate it as needed. This allows for seemingly complex chess games to be replayed and studied by a broad audience.
In a stateful blockchain system such as Ethereum, all of the rules from above still apply. Each node keeps a copy of the blockchain so they are able to validate their current copy of the state and the state began at a commonly agreed upon genesis block. By viewing the state, a participant is able to see contracts on the system in the same way they would see all the chess pieces at any state in the chess game. Similar to each chess piece, each smart contract has a series of rules and permissions associated with it. that govern its behavior. In contrast to the chess game, participants in the ethereum network are able to add valid contracts at any time in the form of a transaction. They will send the transaction to a node responsible for creating valid blocks. Once a series of transactions have been validated, the block of transactions is sent to all the participants who then update their local state. Participants only care about the current state, which contracts they can interact with, and which transaction they want to make next. As the state is shared between all participants, it is important to minimize the amount of data stored on leaf nodes of the states Merkle tree
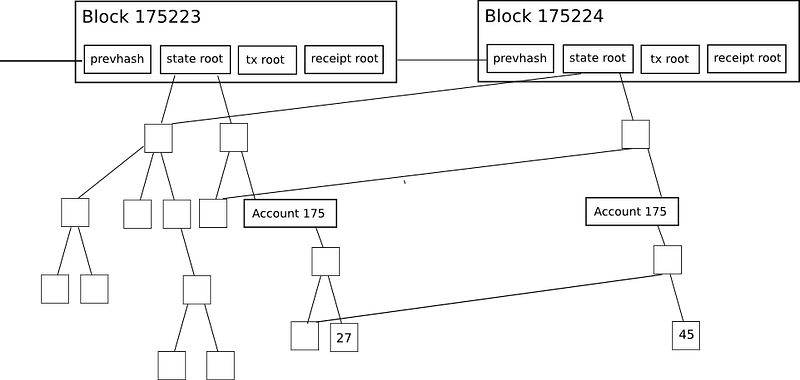
In an ethereum system, all accounts follow the same formatting scheme and are mapped by their unique account address. Both user accounts and contract accounts are stored in the same manner. Each account has:
Each node stores a list of all accounts that have ever made a transaction on the system and maintains the Merkel root of all accounts. When a transition arrives in a block, the new state root is computed and validated against the blocks state root.
For more info on ether trees check out: https://blog.ethereum.org/2015/11/15/merkling-in-ethereum/
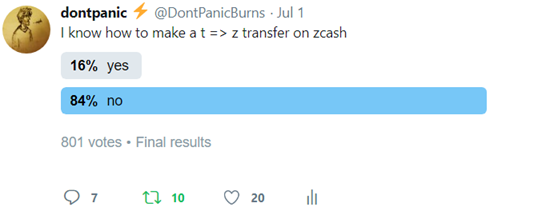
The Zcash value proposition is in private transactions, however, private transactions are not the default and many users simply do not know how to initially create shielded (private) transactions, aka a “t” => “z”. In simple terms, it is important to have a large pool of shielded transactions provides for a larger anonymity set for private transactions; it is harder to pick out any one zebra in a large zeal than it is to point out a single animal in a small cluster. This process, and having more people familiar with it, provides greater value to my work on cross chain atomic swaps (x-cats in zcash speak) so I have attempted to unravel the apparent mystery below. No math, dark magic, animal sacrifice required.
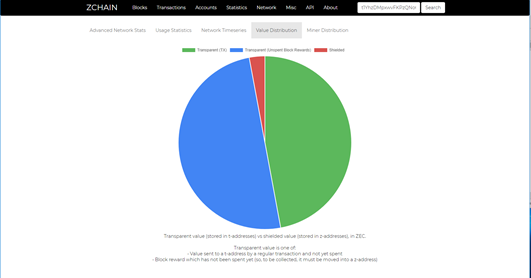
Side note: If you would like to contribute to the greatest good, while exerting minimum effort for the zcash ecosystem, hold you coins in a “z” address. this benefits everyone using zk transactions and increases the size of the anonymity set. Currently, as shown below, this is an uncommon practice.
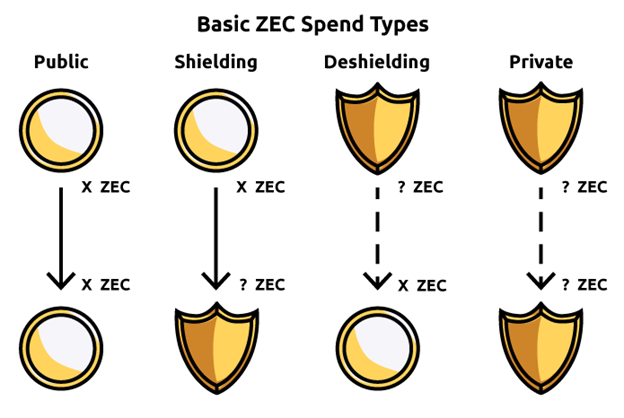
The general process for shielding ZEC is as follows:
The “t” address works the same as a bitcoin address. When you send from your transparent address the change from the transaction will be sent to a new t address you control and all the transactions will be visible on block explorers. “Z” addresses are the private ones and you will only be able to see the balance in the wallet. When sending to and from a Z address, only the exact amount (minus fees) is sent, the change remains with the same “z” address. No one observing the transaction will see any information about the “z” address, except during shielding and deshielding.
2) Fund the “t” address
Funding your “t” address means sending ZEC to it. Zcash can be traded for or purchased many places. Gemini allows US customers to purchase ZEC with US Dollars.
3) Send from your “t” => “z” using a zcash wallet such as zcashd or winzec
It is actually as easy as that sounds. Sending from “t” to “z” or “z” to “z” or “z” to “t” is all the same procedure. This step is overlooked in the zcash documentation because it is so trivial. Maybe they will add it in future versions to avoid confusion. https://github.com/zcash/zcash/wiki/1.0-User-Guide
Notes
“t” addresses send change to new accounts, “z” notes do not
do not send from “z” => same “t” or the change account, always use a ‘clean’ “t” address when deshielding
avoid sending the same amount into and out of shielding transactions. While 10 zec in and out is less traceable than 2.3123 zec, 10 zec in and a random amount of zec out is better
Hard
0. Get zcashd running
Get the latest copy of zcashd (https://github.com/zcash/zcash/releases) or use a docker container (docker pull bcrd/zcash)
To generate a t address you use the commands
$ ./src/zcash-cli getnewaddress
To generate a z address use the command:
$ ./src/zcash-cli z_getnewaddress
2 . Fund your t address
Send ZEC to the t address created above
3. Send many
If you are like me, you hate typing or even pasting long inscrutable numbers. In linux you can save strings with shortcuts like this:
TADDR=”yourAddress”
But actually type or paste your address. after that you can recall it by typing the letters with a dollar sign in front of it:
$TADDR
So assuming you funded your t address with 1.001 zec the `z_sendmany` command will allow you to shield that value:
$ ./src/zcash-cli z_sendmany "$TADDR" "[{\"amount\": 1.0, \"address\": \"$ZADDR\"}]"
Be mindful of the quotes and backslashes, they matter.
This will return you an opid code which is used in your wallet for tracking the shielding process. You can check the progress using:
$ ./src/zcash-cli z_getoperationresult
Status success is what you are wanting. After you get a success you can verify the funds using:
$ ./src/zcash-cli z_listreceivedbyaddress "$ZADDR"
0. Get winZec
Download the “unofficial” windows version of zcash. It can be found at http://winzec.com/
1. Create addresses
click the new T (transparent) address button
click the new Z (private) address button
2. Fund
Fund your “t” address
3. Send
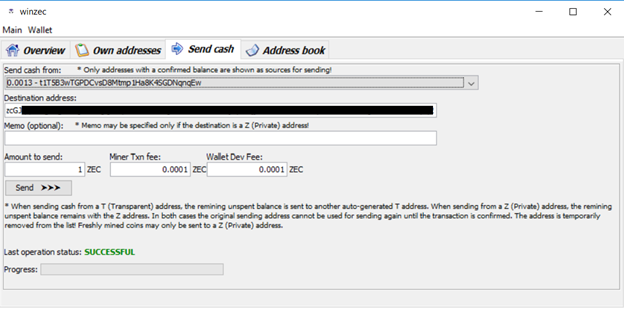
On the send cash tab, select your funded t address. enter your z address in the destination address and the amount to shield.
Click send and watch the progress bar to see when it completes
That’s it!
Note: When you are sending, there are two fee boxes. The first is the network fee, you must pay this to have your transaction included in a block. The second is the wallet dev fee, this is an optional donation to ralfstx to support the windows and mac wallet development. If you have used both methods, you will quickly realize the importance of gui and its continued funding. Open source development is often a thankless process, so money is always nice way of saying thank you.
Tips:
zchbDpcotZTCScgwa2HU2hxhn62yebYphrwDhpK43YAeo158Mo5R8ACiJY1nFjeeMUBf6JYGCoH4Yx4b8YvDW7r5dKtGWnv